


Android smartphones and tablets have a 'Data Saver' feature to reduce the amount of mobile data used. This is a convenient data-saving feature for those on a plan with a data usage cap, who want to restrict their data consumption. This article will explain what the Data Saver feature is, its benefits, and how you can set it up.
What is Android Data Saver?
Android Data Saver is a feature that reduces your data consumption when using devices such as smartphones and tablets.

Data Saver is available on devices running Android 7.0 or later.
You might think you've got plenty of data left because you haven't been using any apps, but your device could actually be using mobile data in the background, meaning you could reach your usage limit before you know it. Data Saver can help you avoid this situation. When Data Saver is turned on, data consumption is automatically optimised to reduce the amount used.
-

Find the perfect smartphone for you.
Cutting-edge phones await. Take a look at the latest and greatest Android devices.
Data Saver: Benefits and some precautions.
Data Saver can help you to optimise your data usage, but there are a few points you should be aware of.
Benefits of Data Saver.
As mentioned above, Data Saver helps to optimise data usage. In other words, its benefit is that it helps you to cut down on the amount of data you use. With Data Saver turned on, you can ensure that apps and services communicate in the background only when you are connected to Wi-Fi. This reduces data consumption during mobile data communication (Spotify, YouTube, Google Photos). This is particularly useful when roaming or towards the end of your billing cycle.
Some precautions with Data Saver.
Data-saving is a function that allows you to reduce your data usage, but there are a few points to bear in mind. The Data Saver does not completely stop data transmission. It's thus important to remember that it can't be used for the purpose of blocking all data transmission. You can switch back to regular data transmission whenever you are able to connect to Wi-Fi. For example, when you think you're near your usage limit and don't have access to Wi-Fi, such as when you're out and about, you can turn on Data Saver to reduce data usage. When in an environment where you can connect to Wi-Fi, like when you're at home, you can use data without restriction.
Setting up Data Saver.
Now let's take a look at how to set up Data Saver on Android devices. Here, we'll use a Pixel phone as an example. *Android 8.0 or later versions needed for all Data Saver functions featured in this article.
Steps for setting up Data Saver.
First of all, let's look at how to turn Data Saver on or off.
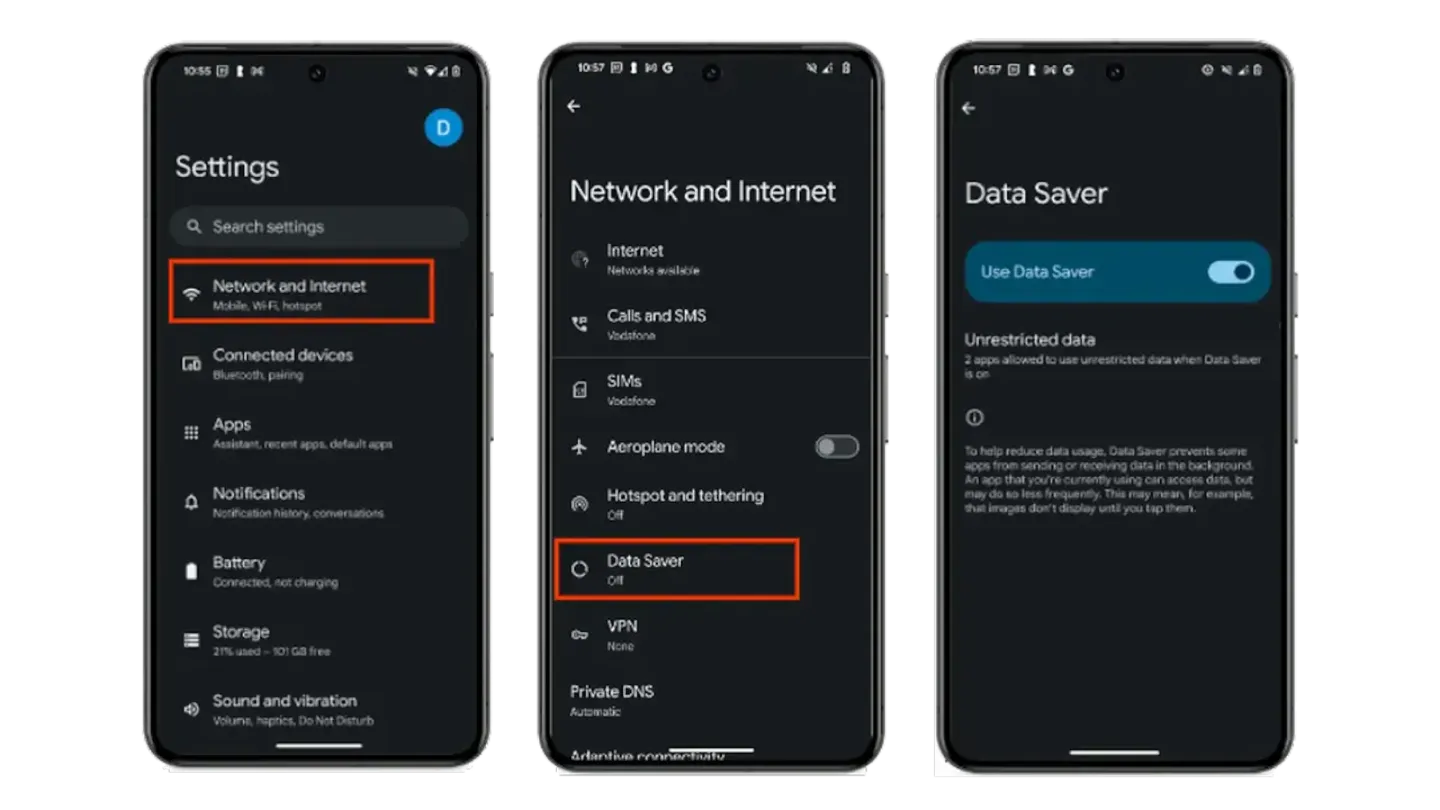
- Open the Settings application on your Android smartphone.
- Tap 'Network & Internet', then 'Data Saver'.
- Switch Data Saver on or off.
- If Data Saver is on, the Data Saver icon will appear in the status bar.
- A notification will also appear at the top of your smartphone's Settings application.
Keeping essential apps running.
Some system apps like Google Play, Clock, and Settings, need to keep running in the background in order to function properly. This is why you can also set mobile data usage permissions for specific apps and services even when you have Data Saver switched on.
Set these up to ensure that essential apps keep working even when you can't connect to Wi-Fi.
- Open your smartphone's Settings application.
- Tap 'Network & Internet' → 'Data Saver' → 'Unrestricted data'.
- Switch on any apps or services that need to use mobile data even when Data Saver is on.
Adding Data Saver to Quick Settings.
By adding Data Saver to Quick Settings, you can switch between the on and off modes more easily. Here, we'll look at the steps for setting up Quick Settings on the Google Pixel.
*Some of these steps are only applicable to Android 11 and later versions.
Customising Quick Settings.
You can add the settings you use often to Quick Settings. The following steps will allow you to customise not only the Data Saver settings but other settings as well.
Steps for adding, setting up and moving settings.
- Swipe down twice from the top of the screen.
- Tap the 'Edit' icon at the bottom right.
- Touch and hold the setting and drag it to where you want it to be displayed.
- To add a setting, drag it up from 'Hold and drag to add tiles'.
- To remove a setting, drag it to 'Drag here to remove'.
Opening Quick Settings.
- To open Quick Settings, swipe down from the top of the screen.
Turning settings on or off.
- To toggle a setting on or off, tap it (dimmed settings are off).
- Press and hold to view the setting's other options.
Checking your data usage.
If you want to switch the Data Saver feature on or off depending on your usage, you need to know how to check your data usage. You can also receive alerts about your data usage, set limits, and automatically switch off mobile data. If you want to manage or reduce your data usage, you should also know about these settings.
*Some of these steps will only work with Android 8.0 or later versions.
*The steps may differ depending on the Android version or model.
Steps for checking data usage.
- Open the Settings application on your Android smartphone or tablet.
- Tap 'Network & Internet', then 'Internet'.
- Tap the Settings icon next to your mobile network provider's name.
- Your total data usage will be shown at the top of the screen.
-
To view graphs and other detailed information, tap 'App data usage'.
i. To pick a time period, tap the Down arrow.
ii. To see how much data each app uses, look below the graph.
Setting up data warnings to receive alerts regarding data usage.
- Open the Settings application on your Android smartphone or tablet.
- Tap 'Network & Internet', then 'Internet.'
- Tap the 'Settings' icon next to your mobile network provider's name.
- Tap 'Data warning & limit'. If needed, first turn on 'Set data warning'.
- Tap 'Data warning'.
- Enter a number. To switch between megabytes (MB) and gigabytes (GB), tap the Down arrow.
- Tap 'Set'.
When your usage reaches the level you picked, you'll get a notification.
Setting a limit and automatically turning off mobile data.
- Open the Settings application on your Android smartphone or tablet.
- Tap 'Network & Internet', then 'Internet'.
- Tap the 'Settings' icon next to your mobile network provider's name.
- Tap 'Data warning & limit'.
- If it's not already on, turn on 'Set data limit'. Check the on-screen message and tap 'OK'.
- Tap 'Data limit'.
- Enter a number. To switch between megabytes (MB) and gigabytes (GB), tap the Down arrow.
- Tap 'Set'.
Now, when your usage reaches the set level , mobile data will automatically switch off. You’ll receive a notification when this happens. To turn mobile data back on, follow the steps above and turn off 'Set data limit'.
Save on data usage with Android's Android Data Saver!
Android Data Saver is a feature that optimises data usage. This setting is ideal when you want to restrict your mobile data usage while roaming or when you are about to reach your usage limit. Learn how to set up and use this feature based on your Wi-Fi availability.
*Some of the information in this article will not apply to all devices. The availability of this product or some of its functionalities may vary depending on the original equipment manufacturer and device manufacturer.
References:
Use less mobile data with Data Saver - Pixel phone Help
Optimise network data usage | Connectivity | Android Developers
Reduce & manage mobile data usage - Pixel Phone Help
Change settings quickly on your Pixel phone | Pixel Phone Help
Find, open & close apps on Android
Manage system apps on company-owned mobile devices - Google Workspace Admin Help